2023/12/13 LabVIEW2020 with Python 3.6.8實作Protocol buffer-LabVIEW取回protobuf資料的替代方案

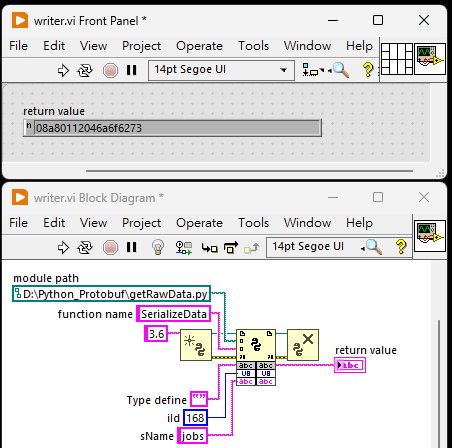
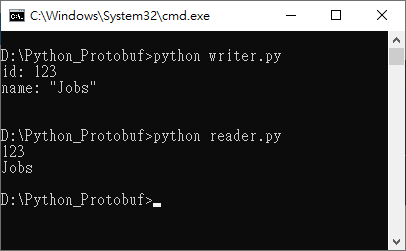
因為谷哥爸爸沒有為LabVIEW提供.proto產生器,所以只能借由第三方語言將protobuf資料取回,用時間及空間換取相對可以執行的方案,下面為實作方式。
利用protobuf的函式庫內的json_format.MessageToJson將protobuf資料轉換json string,LabVIEW再轉回對應的格式使用。
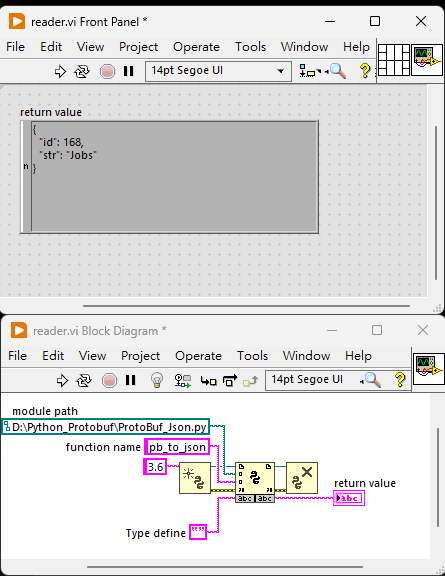
#ProtoBuf_Json.py
from helloworld_pb2 import helloworld
from google.protobuf import json_format
import json

    
def pb_to_json():
    hw = helloworld()
    hw.id = 168
    hw.str = "Jobs"
    strjson = json_format.MessageToJson(hw)
    return strjson

2023/12/12 LabVIEW2020 with Python 3.6.8實作Protocol buffer序列化流程-LabVIEW取回序列化資料驗証

接著”2023-12-12-labview2020-with-python-3-6-8實作protocol-buffer序列化流程-pyhon下的函數驗証“這一篇的後續。
這一篇是要記錄在LabVIEW可以取回python序列化後的結果。

步驟
1. 建立getRawData.py,將收到LabVIEW的iId及sName,寫到hw.id及hw.str。
2. 將序列化後的資料轉為16進制文字返回給LabVIEW.
3. LabVIEW寫入iId及sName後,預期就可以接回序列化的資料。

#getRawData.py
from helloworld_pb2 import helloworld

def SerializeData(iId,sName):
    # 創建一個 helloworld 實例
    hw = helloworld()
    hw.id = iId
    hw.str = sName

    # 返回解析後的數據的十六進制表示形式
    return hw.SerializeToString().hex()

2023/12/12 LabVIEW2020 with Python 3.6.8實作Protocol buffer序列化流程-Pyhon下的函數驗証

接著2023/12/12 LabVIEW2020 with Python 3.6.8實作Protocol buffer序列化流程-建置proto檔並產生Python library (.py)這一篇的後續。
這一篇是要記錄要在Python下確認protobuf library有正常運作。

步驟
1. 建立writer.py,將資料序列化後,寫到helloworld.buffer檔案中。
2. 建立reader.py,將序列化後的helloworld.buffer檔案資料讀出,並反序列化後讀出,顯示原始資料在視窗中。

#riter.py
from helloworld_pb2 import helloworld
 
def main():
    hw = helloworld()
    hw.id = 123
    hw.name = "Jobs"
    print(hw)
 
    with open("helloworld.buffer", "wb") as f:
        f.write(hw.SerializeToString())
 
if __name__ == "__main__":
    main()
#reader.py
from helloworld_pb2 import helloworld
 
def main():
    hw = helloworld()
    with open("helloworld.buffer", "rb") as f:
        hw.ParseFromString(f.read())
        print(hw.id)
        print(hw.name)
  
if __name__ == "__main__":
    main()
序列化及反序列化後的結果
序列化後的二進制檔

2023/12/12 LabVIEW2020 with Python 3.6.8實作Protocol buffer序列化流程-建置proto檔並產生Python library (.py)

步驟
1. 撰寫proto檔,將檔案存到D:\Python_Protobuf
2. 將protoc.exe複製到D:\Python_Protobuf目錄下
3. 執行命令提示視窗打開,將路徑指向到D:\Python_Protobuf下
4. 在命令提示視窗輸入”protoc -I=./ –python_out=./ ./helloworld.proto“
5. 如果沒有問題,在D:\Python_Protobuf會有”helloworld_pb2.py“檔案產生
6. 現在就可以在Python IDE下 import “helloworld” 來使用了

syntax = "proto3";

package helloworld_package;
message helloworld
{
    int32 id = 1;
    string name = 2;
    int32 wow = 3;
}

protoc -I=./ –python_out=./ ./helloworld.proto
-I: 是設定來源路徑
–python_out: 用於設定編譯後的輸出結果,如果使用其它語言請使用對應語言的option
最後一個參數是你要編譯的proto文件

2023/12/12 LabVIEW2020 with Python 3.6.8實作Protocol buffer序列化流程-實作流程說明

LabVIEW呼叫Python進行Protocol buffer序列化流程如下
1. 定義.proto
2. 使用protoc轉出 Python library
3. 撰寫Python函式
4. LabVIEW使用Python node呼叫撰寫好的Python node進行序列化,並取得序列化後byte array結果。
如果是已經有了.proto檔案,則從步驟2開始進行。
如果同事很好心的連.py都幫你準備好了,那就從步驟3開始,寫Python的函式囉。

開發環境
LabVIEW 2020 32bit
Python 3.6.8 32bit
Python 套件 protobuf 3.7.0
protoc-3.6.1-win32.zip

參考資料
https://forums.ni.com/t5/LabVIEW/Using-python-for-protocol-buffer/td-p/3933707
https://protobuf.dev/programming-guides
https://blog.csdn.net/CaoMei_HuaCha/article/details/106326892
https://www.cnblogs.com/jsdkboot/p/15726701.html
https://github.com/protocolbuffers/protobuf/releases/download/v3.6.1/protoc-3.6.1-win32.zip

2023/12/12 LabVIEW2020 with Python 3.6.8實作Protocol buffer序列化流程-LabVIEW環境確認

開發環境
LabVIEW 2020 32bit
Python 3.6.8 32bit
Python 套件 protobuf 3.7.0
protoc-3.6.1-win32.zip

確認LabVIEW2020開發環境流程
1. 開啟並使用Find example
2. 尋找到Python的範例程式
3. 開啟並執行
4. 如果沒有出現問題,代表LabVIEW與Python間連接正常

LabVIEW範例程式
LabVIEW呼叫Python node的程式畫面
LabVIEW呼叫Python的程式碼
可能出現的問題

參考資料
https://forums.ni.com/t5/LabVIEW/Using-python-for-protocol-buffer/td-p/3933707
https://protobuf.dev/programming-guides
https://blog.csdn.net/CaoMei_HuaCha/article/details/106326892
https://github.com/protocolbuffers/protobuf/releases/download/v3.6.1/protoc-3.6.1-win32.zip

2023/12/12 LabVIEW2020 with Python 3.6.8實作Protocol buffer序列化流程-Python環境確認

開發環境
LabVIEW 2020 32bit
Python 3.6.8 32bit
Python 套件 protobuf 3.7.0
protoc-3.6.1-win32.zip

環境確認
Python 環境確認,在命令提示視窗下執行
1. 輸入”python –version”,確認回傳版本是否為3.8.6
2. 輸入”pip list”,確認Package “protobuf”是否安裝,版本是否為3.7.0
3. 將提示路徑移到“protoc.exe”下,輸入“protoc –version”確認版本為libprotoc 3.6.1


參考資料
https://forums.ni.com/t5/LabVIEW/Using-python-for-protocol-buffer/td-p/3933707
https://protobuf.dev/programming-guides
https://blog.csdn.net/CaoMei_HuaCha/article/details/106326892
https://github.com/protocolbuffers/protobuf/releases/download/v3.6.1/protoc-3.6.1-win32.zip

2023/12/11 LabVIEW2020 with Python 3.6.8實作Protocol buffer序列化流程-環境準備篇

開發環境
LabVIEW 2020 32bit
Python 3.6.8 32bit
Python 套件 protobuf 3.7.0
protoc-3.6.1-win32.zip

前言
原於沒有辦法將開發環境全部更新到新版,在有新有舊下的狀況,又有軟體間的相依性問題,上面所列為我自己的開發需求下,相對可以用的狀況,目前還無得知會有什麼意外驚喜。
另外為了日後與作業系統的相容性需求,我的開發環境都會使用32位元的版本。

安裝流程
1. 首先到官網下載並安裝LabVIEW2020 社群版 32位元版
2. 下載並安裝Python 3.6.8
3. 安裝Python套件 protobuf 3.7.0
4. 下載protoc-3.6.1 for windows 32bit,並將其中的protoc.exe放在你的.proto檔案的相同資料中。

參考資料
Using python for protocol buffer
Protocol Buffers Documentation
python 在 windows 环境下如何安装protobuf?
protoc-3.6.1-win32.zip 下載路徑